This project was about electronics and coding. Our final goal was to create a "robot art show" for the robots that had taken over in the future. It was split up mainly into four sections, first learning about how electricity works, then putting it to use to create circuits on a breadboard, and then introducing code into the circuit to allow you to program things, and finally creating the show. After completing the first three sections, we used the information we learned to program an arduino breadboard into a show.
|
My group created a song accompanied with lights which would flash different colors during the beats of the song. Here you can find the code we used to run this program:
const int buzzerPin = 9; // declares an integer called buzzerPin and sets it to pin 9 on the board const int songLength = 60; // amount of notes and spaces in song const int RED_PIN = 10; // declares integer called RED_PIN and sets it to pin 10 on the board const int GREEN_PIN = 11; // declares integer called GREEN_PIN and sets it to pin 11 on the board const int BLUE_PIN = 12; // declares integer called BLUE_PIN and sets it ti pin 12 on the board // Notes is an array of text characters corresponding to the notes // in the song. A space represents a rest (no tone) char notes[] ="h h hh h lllll h h hh h lllll h h hh h lllll h h hh h lllll "; // Beats is an array of values for each note and rest. // A "1" represents a quarter-note, 2 a half-note, etc. // Don't forget that the rests (spaces) need a length as well. int beats[] = {2,1,2,1,1,1,2,2,1,1,1,1,1,2,3,2,1,2,1,1,1,2,2,1,1,1,1,1,2,3,2,1,2,1,1,1,2,2,1,1,1,1,1,2,3,2,1,2,1,1,1,2,2,1,1,1,1,1,2,3}; // The tempo is how fast to play the song. // To make the song play faster, decrease the value. int tempo = 125; void setup() // runs function once at start of command { pinMode(buzzerPin, OUTPUT); // sets buzzerPin (pin 9) to output pinMode(RED_PIN, OUTPUT); // sets RED_PIN to output pinMode(GREEN_PIN, OUTPUT); // sets GREEN_PIN to output pinMode(BLUE_PIN, OUTPUT); // sets BLUE_PIN to output } void loop() // runs function continously { int i, duration; // declaring integer i for (i = 0; i < songLength; i++) // step through the song arrays { int x; // declaring an integer called x x = random(4); // makes x a random value between 0 and 3 duration = beats[i] * tempo; // length of note/rest in ms if (notes[i] == ' ') // is this a rest? { if (x == 0) { // if x equals 0 make the led green green(); } if (x == 1) { // if x equals 1 make the led yellow yellow(); } if (x == 2) { // if x equals 2 make the led cyan cyan(); } if (x == 3) { // if x equals 3 make the led purple purple(); } delay(duration); // then pause for a moment } else // otherwise, play the note { if (x == 0) { green(); } if (x == 1) { yellow(); } if (x == 2) { cyan(); } if (x == 3) { purple(); } tone(buzzerPin, frequency(notes[i]), duration); delay(duration); // wait for tone to finish } delay(tempo/10); // brief pause between notes } } int frequency(char note) { // This function takes a note character (a-g), and returns the // corresponding frequency in Hz for the tone() function. int i; const int numNotes = 2; // number of notes we're storing // The following arrays hold the note characters and their // corresponding frequencies. The last "C" note is uppercase // to separate it from the first lowercase "c". If you want to // add more notes, you'll need to use unique characters. // For the "char" (character) type, we put single characters // in single quotes. char names[] = { 'h' ,'l' }; int frequencies[] = {493, 207}; // Now we'll search through the letters in the array, and if // we find it, we'll return the frequency for that note. for (i = 0; i < numNotes; i++) // Step through the notes { if (names[i] == note) // Is this the one? { return(frequencies[i]); // Yes! Return the frequency } } return(0); // We looked through everything and didn't find it, // but we still need to return a value, so return 0. } void purple() { // function to make led purple digitalWrite(RED_PIN, HIGH); digitalWrite(GREEN_PIN, LOW); digitalWrite(BLUE_PIN, HIGH); } void cyan() { // function to make led cyan digitalWrite(RED_PIN, LOW); digitalWrite(GREEN_PIN, HIGH); digitalWrite(BLUE_PIN, HIGH); } void yellow() { // function to make led yellow digitalWrite(RED_PIN, HIGH); digitalWrite(GREEN_PIN, HIGH); digitalWrite(BLUE_PIN, LOW); } void green() { // function to make led green digitalWrite(RED_PIN, LOW); digitalWrite(GREEN_PIN, HIGH); digitalWrite(BLUE_PIN, LOW); } |
Physics Terms
circuit: a loop of conductive material from one battery terminal/power source to another one voltage: the potential energy difference from one side of a component to the other side current: the flow of electricity through a circuit resistance: an object that alters the flow of current through a circuit making the current decrease power: amount of flow with a potential energy difference breadboard: a board for making models of an electric circuit. 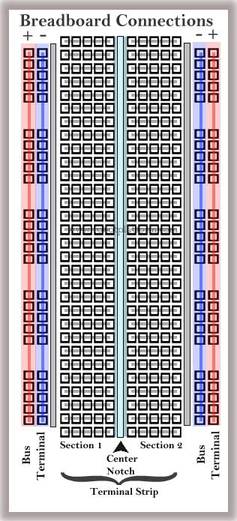
Reflection
During this project, my group and I struggled a fair bit. During the start of the project, there was a lot of grinding out different electrical circuits and noting down how they worked, which after a couple weeks, becomes tiresome. Near the end of this part, we started to slow down and did not finish as soon as we should have. This put us behind schedule for the next bit. After completing the basic electrical circuits and the breadboard experiments, we started using Arduino to code. This part was exciting due to it being very hands on and us having to learn code and use it to solve challenges to create circuits. We started with basics such as turning an l.e.d on and off using the code to progressing to create motors and series of flashing lights. Once we finished 16 Arduino challenges, we were able to create our art show. Figuring out what we actually wanted to do was quite difficult and we ended up bouncing around a few ideas until we decided to create a robot themed song accompanied with dancing lights. The main problem we encountered with the code was making the l.e.d blink to the notes of the song. Since the code could only do one task at a time, we overcame the problem by putting the code which told the l.e.d what color to be inside the code which told the song what note to play. If I where to redo this project, I would have preferred if there were more time given to us to create the art show. Given more time, I would have liked to implement a better song, and possibly a text screen to read the lyrics of the song. |
